使用 Ansible 从 Ubuntu 连接 Windows 服务器的简易指南
本指南将迅速向您展示如何使用运行在 Ubuntu 上的 Ansible 控制 Windows 服务器。请确保您的两个系统都已安装 Python 3.x 和 Ansible。如果您需要安装方面的帮助,可以参考以下文章。
以下是本文所使用的服务器配置:
- Ansible 控制节点 – 192.168.0.108
- Windows 服务器 – 192.168.0.102
第一步:创建 Ansible Windows 用户
我们需要在 Windows 系统上创建一个新的用户,用于 Ansible 连接。
- 在 Windows 中,打开“计算机管理”,然后进入“本地用户和组”。
- 右键点击“用户”并选择“新建用户”。
- 勾选“密码永不过期”,然后点击“创建”。
- 在“组成员”中,右键点击“Administrators”组,然后选择“属性”。
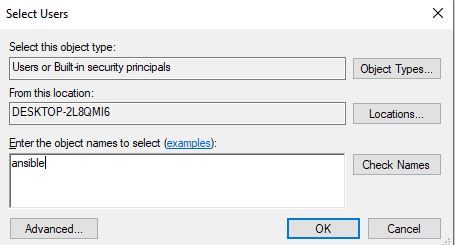
- 点击“添加”,然后在对象名称中输入 “ansible”。
- 点击“检查名称”,然后点击“确定”。
至此,Windows 上的 ansible 用户就设置完成了。
第二步:配置必要的库和 WinRM
切换到您的 Ansible 控制器,更新系统,然后安装以下库:
sudo apt-get update
sudo apt-get install gcc python-dev
sudo apt install python3-pip
WinRM (Windows 远程管理) 允许您在远程 Windows 系统上执行管理任务。我们将安装 python3-winrm,这是一个用于连接 Windows 系统的 Python 客户端。
sudo apt-get install python3-winrm
该命令还会安装一些依赖项,例如 python3-kerberos、python3-ntlm-auth 等。
第三步:更新 Ansible 主机清单
接下来,我们需要编辑 Ansible 的 hosts 文件,指定要连接的 Windows 服务器的 IP 地址。
sudo gedit /etc/ansible/hosts
在文件中添加以下内容:
[win]
192.168.0.102
第四步:更新 Ansible 组变量
创建一个目录,用于存放连接 Windows 系统所需的变量。
mkdir /etc/ansible/group_vars
sudo chmod -R 777 /etc/ansible/
创建一个名为 win.yaml 的文件,并添加第一步中创建的用户信息以及其他必要的连接变量:
gedit /etc/ansible/group_vars/win.yaml
在 win.yaml 文件中添加以下内容:
---
ansible_user: ansible
ansible_password: ansible
ansible_connection: winrm
ansible_winrm_server_cert_validation: ignore
ansible_winrm_transport: basic
ansible_winrm_port: 5985
ansible_python_interpreter: C:Userstechblik.comAppDataLocalProgramsPythonPython37python
第五步:配置 Windows 服务器
打开 Windows PowerShell,并进行必要的更新。 确保您的 Windows 系统安装了 Powershell 3.0 和 .NET Framework 4.0。
$url = "https://raw.githubusercontent.com/jborean93/ansible-windows/master/scripts/Upgrade-PowerShell.ps1"
$file = "$env:tempUpgrade-PowerShell.ps1"
$username = "ansible"
$password = "ansible"
(New-Object -TypeName System.Net.WebClient).DownloadFile($url, $file)
Set-ExecutionPolicy -ExecutionPolicy Unrestricted -Force
&$file -Version 5.1 -Username $username -Password $password -Verbose
为了配置 WinRM,Ansible 提供了一个远程配置脚本。在 PowerShell 中执行该脚本。
$url = "https://raw.githubusercontent.com/ansible/ansible/devel/examples/scripts/ConfigureRemotingForAnsible.ps1"
$file = "$env:tempConfigureRemotingForAnsible.ps1"
(New-Object -TypeName System.Net.WebClient).DownloadFile($url, $file)
powershell.exe -ExecutionPolicy ByPass -File $file
检查 WinRM 监听器配置:
winrm enumerate winrm/config/Listener
将 WinRM 设置为允许 HTTP 流量:
winrm set winrm/config/service '@{AllowUnencrypted="true"}'
设置 WinRM 使用基本身份验证:
winrm set winrm/config/service/auth '@{Basic="true"}'
第六步:测试连接
至此,所有的配置步骤都已经完成。返回 Ansible 控制器,使用 win_ping 模块测试与 Windows 服务器的连接:
ansible win -m win_ping
如果成功,您会看到类似以下的消息:
192.168.0.102 | SUCCESS => {
"changed": false,
"ping": "pong"
}
这表明连接已经建立。您的 Windows 系统现在可以通过 Ubuntu 上的 Ansible 进行远程管理。