在 Google Cloud Platform (GCP) 上构建高性能 WordPress 网站的详细教程
对于初涉博主行业或经营小型企业的用户来说,共享主机 是一种经济实惠的选择。它不需要用户具备专业的托管技能即可安装、设置和维护基础设施平台。
然而,随着网站流量和用户量的增长,我们需要一个强大的托管平台来支持数百万用户的访问,同时保持网站的高速运行。
市面上存在一些针对高流量网站的高级托管服务提供商,但每月费用通常会超过 100 美元。
请注意:Kinsta 最近推出了一项入门计划,起价为每月 30 美元,该计划基于 GCP 架构。
如果您愿意投入一些时间学习并亲自动手操作,您可以考虑使用 VPS 或云服务器。本文将详细介绍如何在 15 分钟内让 WordPress 网站在 Google Cloud Platform 上顺利运行。
这种配置的月度成本约为 25 美元,能够支持每月 50 万次的页面浏览量。在完成设置后,我将进行负载测试以验证其性能。
准备工作
- 假设您已经拥有一个域名;如果没有,您可以通过 Namecheap 或 Google 购买。
- 已启用结算的 Google Cloud 账户
- 一些 WordPress 主题,我将使用 报纸标签主题。
配置新的 Google Cloud 服务器
- 登录 Google Cloud,访问 Compute Engine >> VM Instances ( 直接链接 )
- 点击 “创建实例”,并填写必要信息。
- 选择区域(选择最接近目标受众的地理位置)
- 选择机器类型。
- 将启动磁盘更改为 Ubuntu 18.04 LTS,并将启动磁盘类型更改为 10 GB 大小的 SSD 永久磁盘。
- 允许 HTTP 和 HTTPS 防火墙,然后点击 “创建”。
几秒钟后,新的实例即可准备就绪。

使用 WordOps 安装 WordPress
安装 WordPress 有多种方法,但使用 WordOps 是最便捷的方式之一。
WordOps 是一个脚本封装器,能够自动化安装诸如数据库、PHP-FPM、Nginx、WordPress、Redis 和 phpMyAdmin 等所需组件。手动安装这些组件不仅耗时,而且容易出错。
- 登录新创建的 Google Cloud VM,并切换至 root 用户。
注意:在生产环境中,建议设置一个普通用户,并为其赋予 root 权限。但在本教程中,我将直接使用 root 用户。
- 使用以下命令安装 WordOps:
wget -qO wo wops.cc && sudo bash wo
- 这个过程需要一两分钟。完成后,您将返回到命令行提示符。
Synchronizing wo database, please wait...
WordOps (wo) installed successfully

To enable bash-completion, just use the command:
bash -l

To install WordOps recommended stacks, you can use the command:
wo stack install

To create a first WordPress site, you can use the command:
wo site create site.tld --wp

WordOps Documentation : https://docs.wordops.net
WordOps Community Forum : https://community.wordops.net
WordOps Community Chat : https://chat.wordops.net

Give WordOps a GitHub star : https://github.com/WordOps/WordOps/

[email protected]:~#
接下来,我们来创建一个 WordPress 网站。 如果您需要安装带有缓存插件的 WordPress,WordOps 提供了相应的选项。
目前支持 WP Super Cache、W3 Total Cache、Nginx 和 Redis。经过测试,Redis 的性能表现更为出色。
- 让我们使用 Redis 缓存创建一个站点。
wo site create geekflarelab.com --wpredis
上述命令指示 WordOps 为 geekflarelab.com(这是我的测试域名)创建一个带有 Redis 缓存的站点。这个过程需要大约一两分钟,随后系统会输出有关站点创建的确认信息。
[email protected]:~# wo site create geekflarelab.com --wpredis
Start : wo-kernel [OK]
Adding repository for MySQL, please wait...
Adding repository for NGINX, please wait...
Adding repository for PHP, please wait...
Adding repository for Redis, please wait...
Updating apt-cache              [OK]
Installing APT packages         [OK]
Applying Nginx configuration templates
Testing Nginx configuration     [OK]
Restarting Nginx                [OK]
Testing Nginx configuration     [OK]
Restarting Nginx                [OK]
Configuring php7.2-fpm
Restarting php7.2-fpm           [OK]
Tuning MariaDB configuration
Stop  : mysql     [OK]
Start : mysql     [OK]
Tuning Redis configuration      [OK]
Restarting redis-server         [OK]
Running pre-update checks       [OK]
Setting up NGINX configuration 	[Done]
Setting up webroot 		[Done]
Downloading WordPress 		[Done]
Setting up database		[Done]
Configuring WordPress           [OK]
Installing WordPress            [OK]
Installing plugin nginx-helper  [OK]
Setting plugin nginx-helper     [OK]
Installing plugin redis-cache   [OK]
Testing Nginx configuration     [OK]
Reloading Nginx                 [OK]
HTTP Auth User Name: WordOps
HTTP Auth Password : XXXXXX
WordOps backend is available on https://XX.XX.XX.XX:22222 or https://ubuntu-s-1vcpu-2gb-lon1-01:22222
WordPress admin user : Chandan Kumar
WordPress admin password : lyWwnfOhD8XXXXXXNTS3vXri
Configure redis-cache:	http://geekflarelab.com/wp-admin/options-general.php?page=redis-cache
Object Cache:		Enable
Successfully created site http://geekflarelab.com
[email protected]:~#
- 请妥善保管这些密码。
WordPress 已成功安装。现在需要将您的域名指向服务器的 IP 地址。这很容易实现,不是吗?
获取静态 IP 地址
默认情况下,Google Cloud 会为实例分配一个临时 IP 地址。如果使用此 IP 地址配置域名,则在实例重启后 IP 地址可能会发生变化,造成不便。
为了规避这个问题,我们将保留一个静态 IP 地址。
- 在左侧导航栏中,找到 VPC 网络 >> 外部 IP 地址。
- 下拉 “类型” 菜单,选择 “静态”。

- 输入一个名称,然后点击 “保留”。
- 您会发现 “类型” 已更改为 “静态”。

至此,GCP VM 已经配置好静态外部 IP 和 WordPress。最后一步是将域名映射到静态 IP。
更新域名 A 记录
- 访问您的域名注册商网站。
- 将您的域名 A 记录更新为您刚刚保留的静态外部 IP 地址。
DNS 解析在全球范围内的传播可能需要一些时间。您可以使用 DNS 记录查询工具进行验证。
更新域名 A 记录后,您可以使用您在 WordOps 命令中使用的域名访问 WordPress 站点。例如,我的站点是 http://geekflarelab.com
执行负载测试
接下来,我们来测试一下在 Google Cloud Platform 上新设置的 WordPress 网站的性能。在进行速度测试之前,我将安装一个主题:TagDiv 新闻主题,正如之前所提到的。
这一步并非必须,只是为了确保网站有一些文章和媒体文件,以模拟真实使用场景。
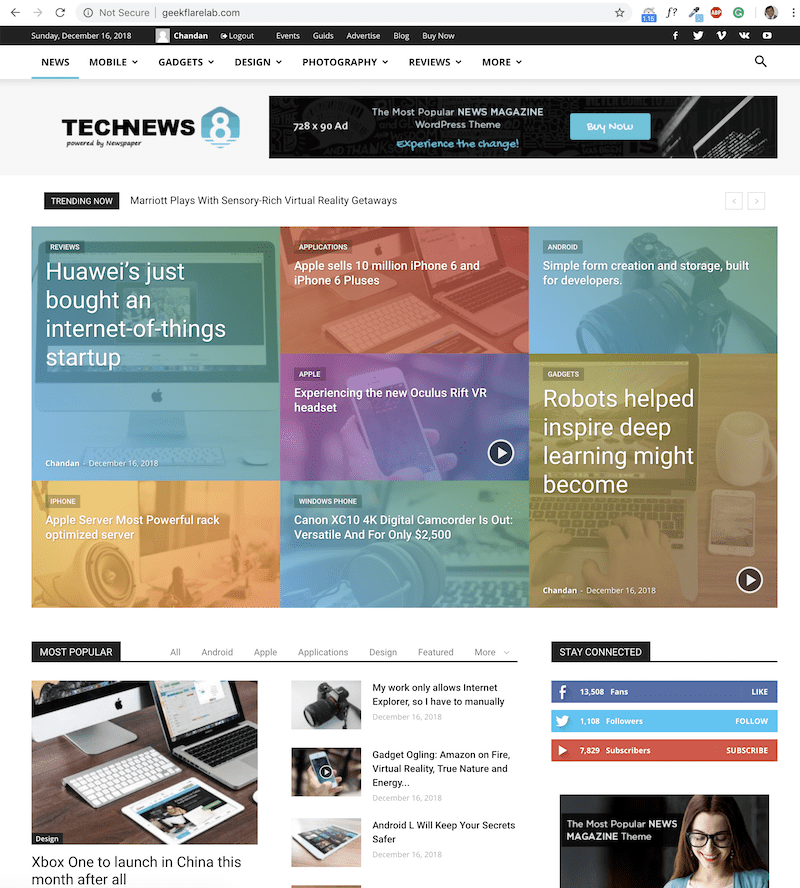
如您所见,geekflarelab.com 已经在 GCP 上成功运行。
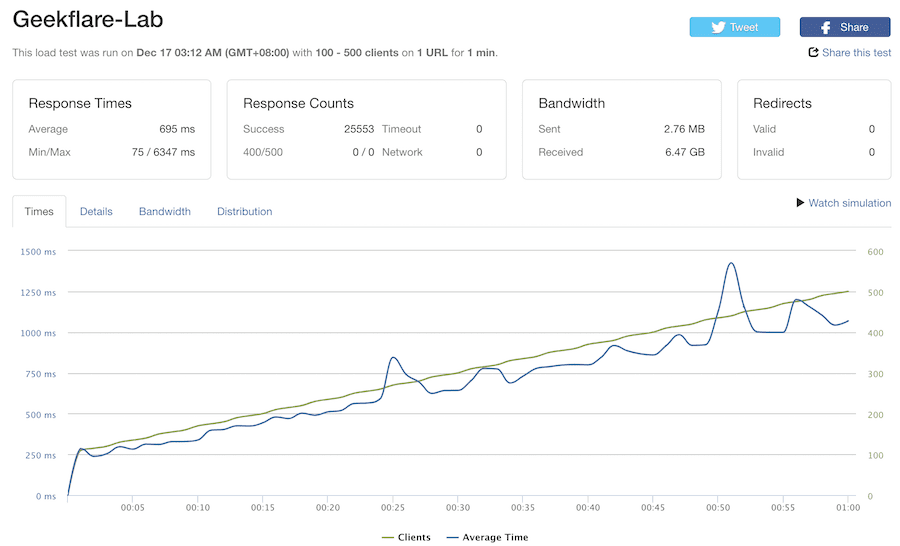
执行基准测试的方法有很多,其中一种简单的方法是从云端执行测试。我使用 Loader.io 模拟了 100 至 500 个用户的访问,时长为一分钟,结果如下:
平均响应时间 = 695 毫秒
当然,这只是一个基本的 WordPress 设置,还需要安装额外的插件,增强安全性,配置 SSL 证书等才能用于生产环境。但这些额外的配置只会带来很小的加载时间增幅。
结论
我希望本文能够帮助您了解如何在 Google Cloud Platform 上设置 WordPress。虽然需要一定的设置时间和技术,但如果您希望节省月度开销,那么这种方法是值得尝试的。
或者,如果您没有时间设置或管理 WordPress,但仍然想使用 Google Cloud,您可以考虑尝试 Cloudways 托管平台。