我将向您阐述管理员如何运用 Ansible Playbook 在远程 Windows 系统上执行一系列操作。
Ansible 堪称当今市场上最炙手可热的 DevOps 工具之一。它内置了众多用于配置和管理 Windows 服务器的模块。本文假设您已在用于管理 Windows 服务器的 Windows 系统上安装了 Ansible。
以下是一些 Windows 管理员日常执行的常见任务。您会惊喜地发现,使用 Ansible 管理 Windows 竟如此便捷。
我的 Ansible Windows 控制器机器的 IP 地址是 192.168.0.106,远程 Windows 系统的 IP 地址是 192.168.0.102。在正式开始之前,请务必先执行 win_ping 模块,以检验您是否能够成功连接到 Windows 远程服务器。
[email protected] ~
$ ansible win -m win_ping
192.168.0.102 | SUCCESS => {
    "changed": false,
    "ping": "pong"
}
我与远程主机的连接已成功建立。
那么,现在让我们开始使用 Ansible Playbook 吧……
复制文件
win_copy 模块是 Ansible 中一个用于将文件从本地服务器传输至远程 Windows 主机的模块。我将利用此模块复制一个 PDF 文件。
请参考下面的 YAML 代码,指定源路径和目标路径。
[email protected] ~
$ vi copy.yml
---
- hosts: win
  tasks:
  - name: Copy File
    win_copy:
      src: C:output.pdf
      dest: C:ansible_examples
      remote_src: yes
现在执行 ansible-playbook 来运行 win_copy。
[email protected] ~
$ ansible-playbook copy.yml
PLAY [win] ***********************************************************************************************************************************
TASK [Gathering Facts] ***********************************************************************************************************************
ok: [192.168.0.102]
TASK [Copy File] *****************************************************************************************************************************
changed: [192.168.0.102]
PLAY RECAP ***********************************************************************************************************************************
192.168.0.102
: ok=2 changed=1 unreachable=0 failed=0
skipped=0 rescued=0 ignored=0
文件已成功复制到远程 Windows 系统中的指定位置。
安装/卸载 MSI
如需通过 MSI 文件安装应用程序,您需要先通过 win_get_url 指定要下载的 MSI 文件路径,然后利用 win_package 模块进行安装。将状态设置为“present”意味着 MSI 文件将被安装到机器上,且应用程序处于安装状态。
在此,我将安装 Apache。
以下是要使用的 YAML 代码:
[email protected] ~
$ vi msi.yml
---
- name: Installing Apache MSI
  hosts: win
  tasks:
    - name: Download the Apache installer
      win_get_url:
        url: https://archive.apache.org/dist/httpd/binaries/win32/httpd-2.2.25-win32-x86-no_ssl.msi
        dest: C:ansible_exampleshttpd-2.2.25-win32-x86-no_ssl.msi
    - name: Install MSI
      win_package:
        path: C:ansible_exampleshttpd-2.2.25-win32-x86-no_ssl.msi
        state: present
现在运行 ansible-playbook,使用 MSI 文件进行安装。
[email protected] ~
$ ansible-playbook msi.yml
PLAY [Installing Apache MSI] *****************************************************************************************************************
TASK [Gathering Facts] ***********************************************************************************************************************
ok: [192.168.0.102]
TASK [Download the Apache installer] *********************************************************************************************************
changed: [192.168.0.102]
TASK [Install MSI] ***************************************************************************************************************************
changed: [192.168.0.102]
PLAY RECAP ***********************************************************************************************************************************
192.168.0.102
: ok=3 changed=2 unreachable=0 failed=0
skipped=0 rescued=0 ignored=0
现在,请进入 Windows 系统,检查 Apache 应用程序是否已成功安装。
C:Userstechblik.com>cd C:Program Files (x86)Apache Software FoundationApache2.2bin
C:Program Files (x86)Apache Software FoundationApache2.2bin>httpd -v
Server version: Apache/2.2.25 (Win32)
Server built: Jul 10 2013 01:52:12
您也可以使用参数来安装 MSI 应用程序。以下示例与上述示例相同,但我们使用“install”参数而非“state”来安装 Apache。
以下是要使用的 YAML 代码:
---
- name: Installing Apache MSI
  hosts: win
  tasks:
    - name: Download the Apache installer
      win_get_url:
        url: https://archive.apache.org/dist/httpd/binaries/win32/httpd-2.2.25-win32-x86-no_ssl.msi
        dest: C:ansible_exampleshttpd-2.2.25-win32-x86-no_ssl.msi
    - name: Install MSI
      win_package:
        path: C:ansible_exampleshttpd-2.2.25-win32-x86-no_ssl.msi
        arguments:
          - /install
          - /passive
          - /norestart
要使用 MSI 文件卸载应用程序,您需要使用 win_package 模块。将状态设置为“absent”意味着将利用 MSI 文件卸载应用程序。
在此,我将卸载 Apache。
[email protected] ~
$ vi uninstall_msi.yml
---
- name: UnInstalling Apache MSI
  hosts: win
  tasks:
    - name: UnInstall MSI
      win_package:
        path: C:ansible_exampleshttpd-2.2.25-win32-x86-no_ssl.msi
        state: absent
现在运行 ansible-playbook,使用 MSI 文件进行卸载。
[email protected] ~
$ ansible-playbook uninstall_msi.yml
PLAY [UnInstalling Apache MSI] *****************************************************************************************************************
TASK [Gathering Facts] ***********************************************************************************************************************
ok: [192.168.0.102]
TASK [UnInstall MSI] *************************************************************************************************************************
changed: [192.168.0.102]
PLAY RECAP ***********************************************************************************************************************************
192.168.0.102
: ok=2 changed=1 unreachable=0 failed=0
skipped=0 rescued=0 ignored=0
现在,如果我再次检查 Apache 的版本,将得到如下输出,表示应用程序已被成功卸载。
C:Program Files (x86)Apache Software FoundationApache2.2bin>httpd -v 'httpd' is not recognized as an internal or external command,
operable program or batch file.
卸载软件(.EXE)
您还可以使用软件的产品 ID 来卸载 .exe 文件对应的软件。
[email protected] ~
$ vi uninstall.yml
---
- hosts: win
  tasks:
   - name: Uninstall 7-Zip from the exe
     win_package:
       path: C:Program Files7-ZipUninstall.exe
       product_id: 7-Zip
       arguments: /S
       state: absent
现在运行 ansible-playbook 来卸载 7-Zip。
[email protected] ~
$ ansible-playbook uninstall.yml
PLAY [win] *************************************************************************************************************************************************************************************
TASK [Gathering Facts] *************************************************************************************************************************************************************************
ok: [192.168.0.102]
TASK [Uninstall 7-Zip from the exe] ***********************************************************************************************************************************************************
changed: [192.168.0.102]
PLAY RECAP *************************************************************************************************************************************************************************************
192.168.0.102              : ok=2    changed=1    unreachable=0    failed=0    skipped=0    rescued=0    ignored=0
停止/启动/重启 Windows 服务
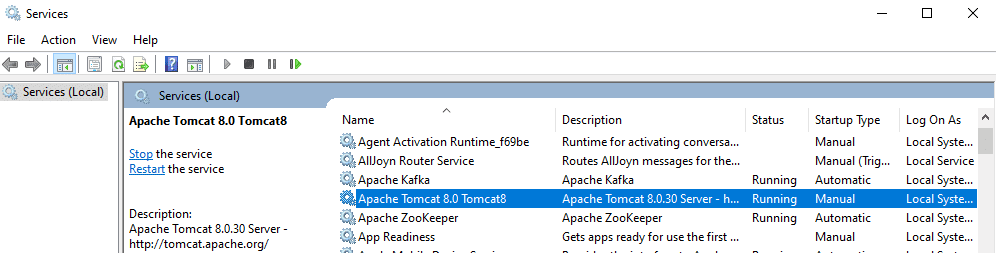
win_service Ansible 模块用于启动、停止或重启服务。在此,我将演示如何停止 Tomcat 服务。
您需要在 YAML 文件中指定服务名称,并将状态设置为停止。
[email protected] ~
$ vi service.yml
---
- hosts: win
  tasks:
   - name: Stop service Tomcat
     win_service:
       name: Tomcat8
       state: stopped
现在运行 ansible-playbook 来停止 Tomcat 服务。
[email protected] ~
$ ansible-playbook service.yml
PLAY [win] ***********************************************************************************************************************************
TASK [Gathering Facts] ***********************************************************************************************************************
ok: [192.168.0.102]
TASK [Stop service Tomcat] ****************************************************************************************************************
changed: [192.168.0.102]
PLAY RECAP ***********************************************************************************************************************************
192.168.0.102
: ok=2 changed=1 unreachable=0 failed=0
skipped=0 rescued=0 ignored=0
如果您在 Windows 系统上检查 Tomcat 服务,会发现它现在处于停止状态。

您可以将状态分别设置为 “started”、“restarted” 或 “paused”,以更改服务的状态。
收集事实
使用 win_disk_facts Ansible 模块,可以检索目标主机的所有磁盘信息。
[email protected] ~
$ vi disk.yml
---
- hosts: win
  tasks:
  - name: Get disk facts
    win_disk_facts:
  - name: Output first disk size
    debug:
      var: ansible_facts.disks[0].size
  - name: Convert first system disk into various formats
    debug:
      msg: '{{ disksize_gib }} vs {{ disksize_gib_human }}'
    vars:
      # Get first system disk
      disk: '{{ ansible_facts.disks|selectattr("system_disk")|first }}'
      # Show disk size in Gibibytes
      disksize_gib_human: '{{ disk.size|filesizeformat(true) }}'
      disksize_gib: '{{ (disk.size/1024|pow(3))|round|int }} GiB'
现在运行 ansible-playbook 以获取磁盘信息。
[email protected] ~
$ ansible-playbook disk.yml
PLAY [win] ***********************************************************************************************************************************
TASK [Gathering Facts] ***********************************************************************************************************************
ok: [192.168.0.102]
TASK [Get disk facts] ************************************************************************************************************************
ok: [192.168.0.102]
TASK [Output first disk size] ****************************************************************************************************************
ok: [192.168.0.102] => {
"ansible_facts.disks[0].size": "1000204886016"
}
TASK [Convert first system disk into various formats] ****************************************************************************************
ok: [192.168.0.102] => {
"msg": "932 GiB vs 931.5 GiB"
}
PLAY RECAP ***********************************************************************************************************************************
192.168.0.102
: ok=4 changed=0 unreachable=0 failed=0
skipped=0 rescued=0 ignored=0
使用 win_command Ansible 模块,您可以在远程主机上执行命令并获取 CPU 信息、设备详细信息等。
wdzwd[email protected] ~
$ vi check.yml
---
- hosts: win
  tasks:
   - name: Get disk facts
     win_command: wmic cpu get caption, deviceid, name, numberofcores, maxclockspeed, status
     register: usage
   - debug: msg="{{ usage.stdout }}"
运行 Ansible Playbook 以获取远程系统信息。
[email protected] ~
$ ansible-playbook check.yml
PLAY [win] ***********************************************************************************************************************************
TASK [Gathering Facts] ***********************************************************************************************************************
ok: [192.168.0.102]
TASK [Get facts] ************************************************************************************************************************
changed: [192.168.0.102]
TASK [debug] *********************************************************************************************************************************
ok: [192.168.0.102] => {
"msg": "Caption DeviceID MaxClockSpeed
Name
NumberOfCores Status rrnIntel64 Family 6 Model 142 Stepping 9 CPU0 2712 Intel(R) Core(TM) i5-7200U CPU @ 2.50GHz 2 OK rrnrrn"
}
PLAY RECAP ***********************************************************************************************************************************
192.168.0.102
: ok=3 changed=1 unreachable=0 failed=0
skipped=0 rescued=0
ignored=0
运行命令
您在 Windows 系统上运行的所有命令都可以通过 Ansible 的 win_command 模块执行。您只需要在 YAML 文件中指定命令即可。在此,我将创建一个目录。
[email protected] ~
$ vi commands.yml
---
- hosts: win
  tasks:
   - name: run an executable using win_command
     win_command: whoami.exe
   - name: run a cmd command
      win_command: cmd.exe /c mkdir C:test
现在运行 ansible-playbook,以执行 win_command 操作。
[email protected] ~
$ ansible-playbook commands.yml
PLAY [win] ***********************************************************************************************************************************
TASK [Gathering Facts] ***********************************************************************************************************************
ok: [192.168.0.102]
TASK [run an executable using win_command] ***************************************************************************************************
changed: [192.168.0.102]
TASK [run a cmd command] *********************************************************************************************************************
changed: [192.168.0.102]
PLAY RECAP ***********************************************************************************************************************************
192.168.0.102
: ok=3 changed=2 unreachable=0 failed=0
skipped=0 rescued=0 ignored=0
环境变量
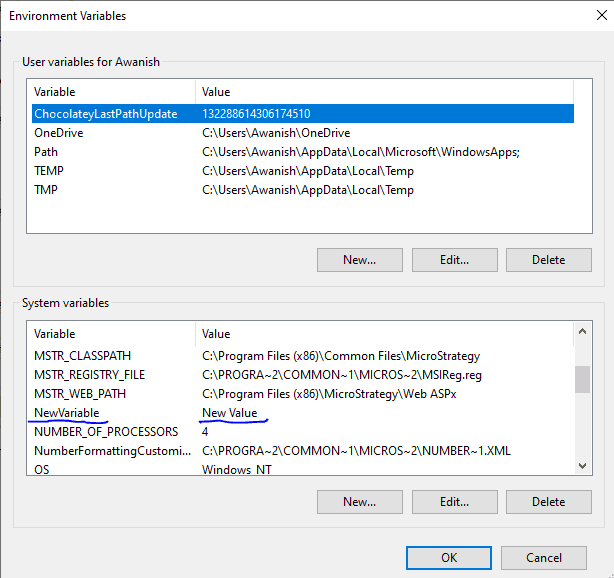
Windows 系统包含多个环境变量,例如 JAVA_HOME。通过 win_environment Ansible 模块,您可以在 Windows 系统上添加或修改环境变量。在此示例中,我将一个新的变量添加到 Windows 环境变量列表中。
[email protected] ~
$ vi env.yml
---
- hosts: win
  tasks:
   - name: Set an environment variable for all users
     win_environment:
       state: present
       name: NewVariable
       value: New Value
       level: machine
运行 ansible-playbook 以在远程 Windows 机器上添加环境变量。
[email protected] ~
$ ansible-playbook env.yml
PLAY [win] ***********************************************************************************************************************************
TASK [Gathering Facts] ***********************************************************************************************************************
ok: [192.168.0.102]
TASK [Set an environment variable for all users] *********************************************************************************************
changed: [192.168.0.102]
PLAY RECAP ***********************************************************************************************************************************
192.168.0.102
: ok=2 changed=1 unreachable=0 failed=0
skipped=0 rescued=0 ignored=0
进入环境变量窗口,您会看到您刚刚添加的新变量已出现在列表中。
添加/编辑注册表
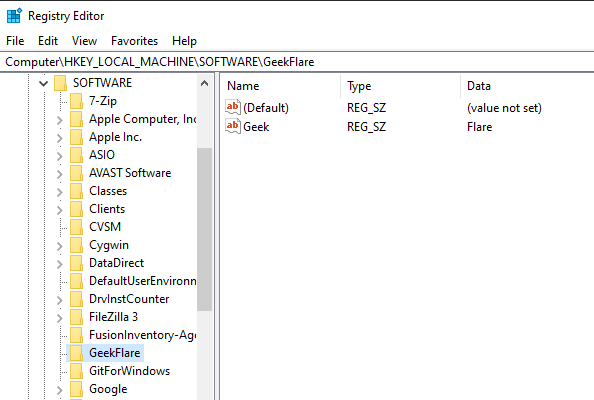
win_regedit Ansible 模块用于在远程 Windows 机器上添加或编辑注册表详细信息。您需要提供注册表的路径和要添加/更新的内容。在此,我在 HKLM:SOFTWARE 路径下创建一个新的注册表项 techblik.com,然后为此注册表添加名称和数据。
[email protected] ~
$ vi registry.yml
---
- hosts: win
  tasks:
   - name: Creating a registry
     win_regedit:
      path: HKLM:SOFTWAREtechblik.com
   - name: Modifying a registry, adding name and data
     win_regedit:
      path: HKLM:SOFTWAREtechblik.com
      name: Geek
      data: Flare
现在运行 ansible-playbook 以添加注册表。
[email protected] ~
$ ansible-playbook registry.yml
PLAY [win] ***********************************************************************************************************************************
TASK [Gathering Facts] ***********************************************************************************************************************
ok: [192.168.0.102]
TASK [Creating a registry] *******************************************************************************************************************
changed: [192.168.0.102]
TASK [Modifying a registry, adding name and data] ********************************************************************************************
changed: [192.168.0.102]
PLAY RECAP ***********************************************************************************************************************************
192.168.0.102
: ok=3 changed=2 unreachable=0 failed=0
skipped=0 rescued=0 ignored=0
如果您转到远程系统上的注册表编辑器,您可以看到此注册表已成功添加,并包含名称和数据参数。
删除日志
win_eventlog Ansible 模块用于在 Windows 系统中添加、清除或删除 Windows 事件日志。
请打开 Windows Powershell,并列出远程 Windows 机器上现有的事件日志。
PS C:Userstechblik.com> Get-EventLog -List
  Max(K) Retain OverflowAction        Entries Log
  ------ ------ --------------        ------- ---
  20,480      0 OverwriteAsNeeded      33,549 Application
  20,480      0 OverwriteAsNeeded           0 HardwareEvents
     512      7 OverwriteOlder             20 Internet Explorer
  20,480      0 OverwriteAsNeeded           0 Key Management Service
     128      0 OverwriteAsNeeded         190 OAlerts
                                              Security
  20,480      0 OverwriteAsNeeded      44,828 System
  15,360      0 OverwriteAsNeeded       3,662 Windows PowerShell
现在,我将演示如何删除 Internet Explorer 的所有日志。
[email protected] ~
$ vi log.yml
---
- hosts: win
  tasks:
   - name: Remove Internet Explorer Logs
     win_eventlog:
      name: Internet Explorer
      state: absent
运行 ansible-playbook 以删除远程 Windows 机器上的 Internet Explorer 日志。
[email protected] ~
$ ansible-playbook log.yml
PLAY [win] *************************************************************************************************************************************************************************************
TASK [Gathering Facts] *************************************************************************************************************************************************************************
ok: [192.168.0.102]
TASK [Remove Internet Explorer Logs] **********************************************************************************************************************************************
changed: [192.168.0.102]
PLAY RECAP *************************************************************************************************************************************************************************************
192.168.0.102              : ok=2    changed=1    unreachable=0    failed=0    skipped=0    rescued=0    ignored=0
现在,如果您再次列出 EventLogs,您会发现 Internet Explorer 日志已被删除。
PS C:Userstechblik.com> Get-EventLog -List
  Max(K) Retain OverflowAction        Entries Log
  ------ ------ --------------        ------- ---
  20,480      0 OverwriteAsNeeded      33,549 Application
  20,480      0 OverwriteAsNeeded           0 HardwareEvents
  20,480      0 OverwriteAsNeeded           0 Key Management Service
     128      0 OverwriteAsNeeded         190 OAlerts
                                              Security
  20,480      0 OverwriteAsNeeded      44,835 System
  15,360      0 OverwriteAsNeeded          56 Windows PowerShell
以上就是关于可用于远程 Windows 管理的 Ansible Playbook 的全部内容。请继续尝试这些 Playbook。您也可以尝试其他可用的 Ansible Windows 模块。