rsync:强大的文件同步工具
rsync 是一款免费的命令行实用工具,它允许您在本地系统以及远程服务器之间同步文件。您可以使用它来传输各种类型的文件和目录结构。
rsync 在数据迁移、备份和镜像等场景中非常有用,对于需要执行重复数据传输任务的网站管理员和系统管理员来说,它是一个理想的选择。
本文将深入探讨 rsync 的工作原理,并通过一系列实用示例来展示其强大功能。
rsync 的工作原理
rsync 是一种专为类 Unix 系统设计的远程同步命令行工具。它使用户能够在不同的计算机或同一机器上的不同位置之间轻松地传输和同步文件。
rsync 的核心在于其增量传输算法。该算法仅复制两个文件之间存在的差异,而不是每次都复制整个文件。源文件和目标文件可以在本地或远程系统上。rsync 支持两种主要的数据复制/同步方式:
- 通过 SSH 或 RSH 在两台主机之间进行复制/同步。
- 通过 TCP rsync 守护进程进行复制/同步。
由于 rsync 最初是为类 Unix 系统开发的,因此它也可以在 Linux 系统上完美运行。
rsync 的同步过程可以概括为以下几个步骤:
- rsync 使用 SSH 连接到远程主机,可能需要输入密码。
- 连接建立后,远程主机的 rsync 与源主机上的 rsync 进行通信。
- 双方程序会确定需要同步的文件和目录,并使用增量传输算法来查找文件之间的差异。
如果 rsync 在远程主机上找到本地主机上没有的文件,它会将该文件复制并传输到本地主机。对于本地和远程主机上都存在的文件,rsync 只会复制它们之间的差异部分。对于两个系统上都存在且没有任何修改的文件,rsync 会忽略它们。
rsync 通过将文件差异存储在临时文件中来实现增量更新,然后再将这些差异推送到目标位置。
开始使用 rsync 之前,您需要确保:
- 您拥有 root 或 sudo 权限。
- 您可以访问终端/命令行。
- 您可以通过 SSH 安全地运行 rsync 命令。
- 您需要至少两台机器来测试 rsync 的功能。
在本教程中,我们将在 Linux Mint 21.1 Vera 系统上进行操作。但是,您也可以在任何其他 Linux 发行版上按照这些步骤进行操作,不会有任何问题。
为什么选择 rsync 而不是 scp?
scp(安全复制)是另一种常用的命令行协议,允许用户复制文件。但是,scp 采用线性复制方式,即每次都将整个文件从源复制到目标,它同样使用 SSH 来实现安全传输。
scp 命令的语法如下:
scp [选项] 源文件 目标文件那么,为什么我们应该选择 rsync 而不是 scp 呢?
rsync 相比 scp 有许多优势,其中包括:
- 更快的执行速度: rsync 的速度比 scp 更快,因为它使用远程更新协议,只传输文件差异部分,而不是整个文件。这意味着,如果您需要定期同步文件,第一次执行时会进行完整复制,后续操作只需要复制更改的部分。
- 减少带宽消耗: rsync 不需要重复复制整个文件,从而降低了带宽消耗。它还使用压缩/解压缩算法来进一步缩小传输过程中的文件大小。
- 更多的命令行选项: rsync 提供了比 scp 更多的命令行选项,这意味着您可以使用 rsync 进行更细致的调整,以满足不同的同步需求。
总而言之,rsync 是一种优秀的增量同步工具。 scp 也可以用来安全地传输/同步文件。 在日常使用中,如果您需要快速直接地复制文件,scp 是一个不错的选择。 但是,对于重复性任务,强烈建议使用 rsync。
rsync 命令语法
rsync 命令的基本语法如下:
rsync [选项] 源文件/目录 目标文件/目录其中各部分的含义如下:
- 选项: 用于指定 rsync 的行为的各种参数。
- 源文件/目录: 要复制的文件或目录的路径。
- 目标文件/目录: 文件或目录复制到的位置。
- USER: 远程用户名。
- HOST: 远程主机名或 IP 地址。
选项是为命令提供额外功能的参数。 例如,您可以使用 -r 选项来递归同步目录。 但是,-r 选项不会同步组和用户的所有权、时间戳、权限或符号链接。 要保留这些属性,您可以使用 -a 选项,该选项以归档模式运行命令,确保在复制时保留所有文件的所有权、权限和符号链接。
其他常用的 rsync 选项包括:
-z:压缩数据以节省传输时的带宽。-h:以人类可读的格式输出结果。-b:在数据同步过程中创建备份。-e:使用 SSH 协议进行远程数据传输。--progress:显示数据同步的进度。-v:显示详细的 rsync 输出。-n:执行空运行以测试数据同步的设置。-q:抑制 rsync 命令的输出和选项。
安装 rsync
大多数 Unix 和 Linux 系统都预装了 rsync。 如果您的系统没有安装 rsync,您可以使用以下命令进行安装:
对于 Debian/Ubuntu 和 Mint:
sudo apt-get install rsync对于 Arch Linux:
pacman -S rsync对于 Gentoo:
emerge sys-apps/rsync对于 CentOS/Fedora/REHL:
sudo yum install rsync对于 openSUSE:
sudo zypper install rsync由于我们使用的是 Linux Mint,它已经预装了 rsync。 您可以在终端中运行 rsync 命令来验证它是否已安装。如果已安装,它将显示其功能、选项和其他相关信息。
    nitt ~
    $ rsync
    rsync  version 3.2.3  protocol version 31
    Copyright (C) 1996-2020 by Andrew Tridgell, Wayne Davison, and others.
    Web site: https://rsync.samba.org/
    Capabilities:
        64-bit files, 64-bit inums, 64-bit timestamps, 64-bit long ints,
        socketpairs, hardlinks, hardlink-specials, symlinks, IPv6, atimes,
        batchfiles, inplace, append, ACLs, xattrs, optional protect-args, iconv,
        symtimes, prealloc, stop-at, no crtimes
    Optimizations:
        SIMD, no asm, openssl-crypto
    Checksum list:
        xxh128 xxh3 xxh64 (xxhash) md5 md4 none
    Compress list:
        zstd lz4 zlibx zlib none

    rsync comes with ABSOLUTELY NO WARRANTY.  This is free software, and you
    are welcome to redistribute it under certain conditions.  See the GNU
    General Public Licence for details.

    rsync is a file transfer program capable of efficient remote update
    via a fast differencing algorithm.
接下来,让我们看看如何在不同的实际场景中使用 rsync。
在本教程中,我们将创建两个目录:
- 源目录
- 目标目录
为此,请键入以下命令:
    mkdir source-directory
    mkdir dest-directory
另外,我们需要生成一些文件来进行 rsync 测试。因此,让我们使用以下命令创建一些测试文件:
touch source-directory/file{1..100}
这将在源目录中创建 100 个空文件。您可以通过输入以下命令来验证:
    ls source-directory
    Output:
    nitt rsync-tutorial
    $ ls
    dest-directory  source-directory
    nitt rsync-tutorial
    $ touch source-directory/file{1..100}
    nitt rsync-tutorial
    $ ls source-directory
    file1    file18  file27  file36  file45  file54  file63  file72  file81  file90
    file10   file19  file28  file37  file46  file55  file64  file73  file82  file91
    file100  file2   file29  file38  file47  file56  file65  file74  file83  file92
    file11   file20  file3   file39  file48  file57  file66  file75  file84  file93
    file12   file21  file30  file4   file49  file58  file67  file76  file85  file94
    file13   file22  file31  file40  file5   file59  file68  file77  file86  file95
    file14   file23  file32  file41  file50  file6   file69  file78  file87  file96
    file15   file24  file33  file42  file51  file60  file7   file79  file88  file97
    file16   file25  file34  file43  file52  file61  file70  file8   file89  file98
    file17   file26  file35  file44  file53  file62  file71  file80  file9   file99
注意:我们将目标目录 (dest-directory) 保持为空。
在本地递归复制目录
虽然 rsync 的主要用途是在本地和远程服务器之间复制文件,但它同样适用于在本地复制文件。
在这种情况下,我们将使用以下 rsync 语法:
rsync [选项] 源文件/目录 目标文件/目录
通过运行以下命令将源目录中的文件复制到目标目录:
rsync -r source-directory/ dest-directory
在这里,命令将文件从源目录“递归地”复制到目标目录。
  nitt rsync-tutorial
  $ ls
  dest-directory  source-directory
  nitt rsync-tutorial
  $ ls dest-directory
  nitt rsync-tutorial
  $ ls source-directory
  file1    file18  file27  file36  file45  file54  file63  file72  file81  file90
  file10   file19  file28  file37  file46  file55  file64  file73  file82  file91
  file100  file2   file29  file38  file47  file56  file65  file74  file83  file92
  file11   file20  file3   file39  file48  file57  file66  file75  file84  file93
  file12   file21  file30  file4   file49  file58  file67  file76  file85  file94
  file13   file22  file31  file40  file5   file59  file68  file77  file86  file95
  file14   file23  file32  file41  file50  file6   file69  file78  file87  file96
  file15   file24  file33  file42  file51  file60  file7   file79  file88  file97
  file16   file25  file34  file43  file52  file61  file70  file8   file89  file98
  file17   file26  file35  file44  file53  file62  file71  file80  file9   file99
  nitt rsync-tutorial
  $ rsync -r source-directory/ dest-directory
  nitt rsync-tutorial
  $ ls dest-directory
  file1    file18  file27  file36  file45  file54  file63  file72  file81  file90
  file10   file19  file28  file37  file46  file55  file64  file73  file82  file91
  file100  file2   file29  file38  file47  file56  file65  file74  file83  file92
  file11   file20  file3   file39  file48  file57  file66  file75  file84  file93
  file12   file21  file30  file4   file49  file58  file67  file76  file85  file94
  file13   file22  file31  file40  file5   file59  file68  file77  file86  file95
  file14   file23  file32  file41  file50  file6   file69  file78  file87  file96
  file15   file24  file33  file42  file51  file60  file7   file79  file88  file97
  file16   file25  file34  file43  file52  file61  file70  file8   file89  file98
  file17   file26  file35  file44  file53  file62  file71  file80  file9   file99
这会将源目录中的每个文件都复制到目标目录。
本地复制单个文件
现在,我们已经学习了如何同步两个目录,接下来我们将学习如何复制单个文件。
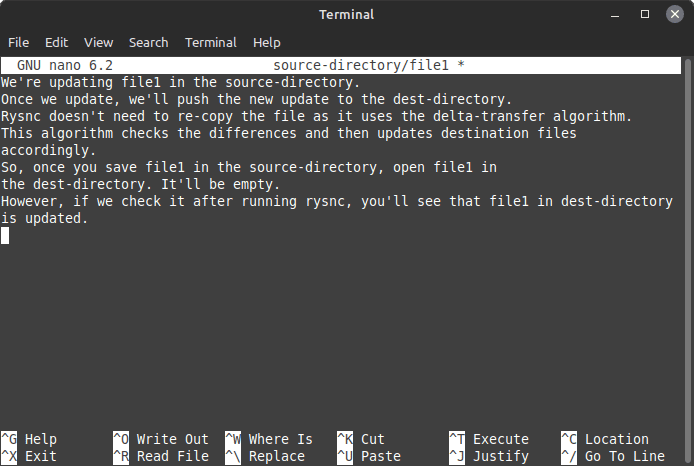
为此,我们将编辑源目录中的空文件 file1,然后将其与目标目录中已存在的同一文件同步。
要编辑该文件,请键入以下命令:
nano source-directory/file1
现在,将以下文本复制粘贴到 nano 编辑器中:
   We're updating file1 in the source-directory.
   Once we update, we'll push the new update to the dest-directory.
   rsync doesn't need to re-copy the file using the delta-transfer algorithm.
   This algorithm checks the differences and then updates destination files
   accordingly.
   So, once you save file1 in the source-directory, open file1 in
   the dest-directory. It'll be empty.
   However, if we check it after running rsync, you'll see that file1 in dest-directory
   is updated.
 向文件添加内容
现在,关闭并保存文件。
现在,让我们使用 rsync 复制该文件:
sudo rsync -v --existing source-directory/file1 /dest-directory
    #Output
    nitt rsync-tutorial
    $ sudo rsync -v --existing source-directory/file1 dest-directory
    file1

    sent 557 bytes  received 35 bytes  1,184.00 bytes/sec
    total size is 474  speedup is 0.80

    nitt rsync-tutorial
    $
您可能已经注意到,我们使用了 --existing 选项。 此选项用于更新已存在的文件。 如果您在不使用 --existing 选项的情况下运行该命令,即使命令成功执行,也不会更新文件。
如果目标文件夹中不存在您要复制的单个文件,则需要运行以下命令:
rsync -v source-directory/newfile dest-directory
    #Output
    nitt rsync-tutorial
    $ rsync -v source-directory/newfile dest-directory
    newfile

    sent 82 bytes  received 35 bytes  234.00 bytes/sec
    total size is 0  speedup is 0.00
复制多个文件
如果您打算复制多个文件,则必须指定这两个文件的源路径,然后再指定目标目录。
为此,我们将在源目录中创建两个新文件:newfile2 和 newfile3。 运行以下命令来执行此操作:
touch source-directory/newfile{2..3}
现在,使用以下命令同步多个文件:
rsync -v source-directory/newfile2 source-directory/newfile3 dest-directory
    #Output
    nitt rsync-tutorial
    $ rsync -v source-directory/newfile2 source-directory/newfile3 dest-directory
    newfile2
    newfile3

    sent 135 bytes  received 54 bytes  378.00 bytes/sec
    total size is 0  speedup is 0.00
    nitt rsync-tutorial
    $
将文件或目录从本地复制到远程
将文件从本地传输到远程的 rsync 语法如下:
rsync [选项] 源文件/目录 [email protected]:目标文件/目录
如您所见,您需要知道远程机器的 IP 地址才能完成此操作。此外,您需要在源文件/目录路径后添加 IP 地址。
rsync -av /Projects/rsync-tutorial/source-directory 192.168.192.200: /Projects/rsync-tutorial/dest-directory
在开始传输之前,系统会要求您输入密码。 输入密码继续操作。此外,如果远程计算机上的用户名与本地计算机不同,则需要在 IP 地址之前添加 @ 和远程用户名。
rsync -av /Projects/rsync-tutorial/source-directory [email protected]: /Projects/rsync-tutorial/dest-directory
如果要复制多个文件或目录,则需要列出文件或目录的路径。 其语法如下:
rsync -av /Projects/rsync-tutorial/source-directory/newfile1 /Projects/rsync-tutorial/source-directory/newfile2 192.168.192.200: /Projects/rsync-tutorial/dest-directory
通过特定协议进行远程传输
rsync 允许您指定特定的文件传输协议。为此,您需要使用 -e 选项,后跟协议。
例如,如果要使用 SSH 协议,则必须将 -e ssh 附加到 rsync 命令:
rsync -e ssh /Projects/rsync-tutorial/source-directory 192.168.192.200: /Projects/rsync-tutorial/dest-directory
将文件或目录从远程复制到本地
将文件从远程传输到本地的 rsync 语法如下:
rsync [选项] [email protected]:源文件/目录 目标文件/目录
这相当于一个拉取请求。 因此,要从远程服务器获取所需的文件/目录到本地计算机,您需要运行以下命令:
rsync -av 192.168.192.200: /Projects/rsync-tutorial/dest-directory /Projects/rsync-tutorial/source-directory
该命令会将远程机器的目标目录中的文件拉到本地机器的源目录中。
同样,您也可以通过提供完整路径来提取特定的文件:
rsync -av 192.168.192.200: /Projects/rsync-tutorial/dest-directory/newfile4 /Projects/rsync-tutorial/source-directory
要将多个文件或目录从本地复制到远程,您需要在服务器 IP 地址后的大括号(以逗号分隔)内指定路径:
rsync -av 192.168.192.200: {/Projects/rsync-tutorial/dest-directory/, /home/music/2023-music} /Projects/rsync-tutorial/source-directory
同样,您也可以指定文件:
在传输过程中显示实时进度
在进行大型数据备份时,查看实时进度是一个好主意。 为此,您需要使用 --progress 标志。 将其添加到 rsync 命令后,您可以查看传输速度、剩余时间和传输的数据量:
rsync -av --progress 192.168.192.200: /Projects/rsync-tutorial/dest-directory /Projects/rsync-tutorial/source-directory
传输完成后删除源文件
您可以使用 --remove-source-files 标志在传输完成后删除源文件。 这在许多情况下非常有用,特别是当您想要保护您的文件,不留下任何痕迹,或者仅仅是为了释放空间时:
rsync -av --remove-source-files 192.168.192.200: /Projects/rsync-tutorial/dest-directory /Projects/rsync-tutorial/source-directory
rsync 空运行
rsync 还允许您在实际运行之前进行评估。 试运行可以帮助您检查是否正在执行正确的操作。 毕竟,您不希望错误地更新文件或删除它们。
您需要使用 --dry-run 选项来进行试运行。 将其添加到命令中,然后再添加源和目标:
sudo rsync -v --dry-run source-directory/file1 dest-directory
    nitt rsync-tutorial
    $ sudo rsync -v --dry-run source-directory/file1 dest-directory
    file1

    sent 43 bytes  received 19 bytes  124.00 bytes/sec
    total size is 474  speedup is 7.65 (DRY RUN)
    nitt rsync-tutorial
输出类似于我们之前运行的方式。 但是,您会注意到输出的末尾提到了 (DRY RUN)。
设置最小和最大文件大小
rsync 还允许您在传输过程中设置最小或最大文件大小。
所以,如果您只想传输最小大小为 15KB 的文件,您需要使用 --min-size=15k:
rsync -av --min-size=15k 192.168.192.200: /Projects/rsync-tutorial/dest-directory /Projects/rsync-tutorial/source-directory
该命令只会复制最小文件大小为 15KB 的文件。 如果文件大小小于此值,则会忽略它。
同样,您可以使用 --max-size 标志来设置最大文件大小:
rsync -av --max-size=450k 192.168.192.200: /Projects/rsync-tutorial/dest-directory /Projects/rsync-tutorial/source-directory
在这里,rsync 将忽略大小超过 450K 的文件。
设置带宽限制
如果您正在执行其他带宽密集型任务,则可以设置 rsync 来限制传输的带宽。为此,请使用 --bwlimit=KB/s:
rsync -av --bwlimit=100 --progress 192.168.192.200: /Projects/rsync-tutorial/dest-directory /Projects/rsync-tutorial/source-directory
在此示例中,我们将传输过程中的带宽限制设置为 100Kb/s。
总结
本文结束了 rsync 命令指南。我们学习了如何使用 rsync,并且有效地涵盖了大量命令。
然而,rsync 提供的功能远不止我们在这里介绍的。这就是为什么您可能还希望查阅 rsync 的手册页,其中涵盖了 rsync 的各个方面。
最后,您可以查看适用于 Windows、Linux 和 macOS 的命令行备忘单。